What is an Electrolytic Capacitor?
Think of a capacitor as a tiny rechargeable battery. While a battery releases energy slowly over time, a capacitor releases it almost instantly when needed. This makes capacitors essential for smoothing out power supply fluctuations and filtering noise in electronic circuits.
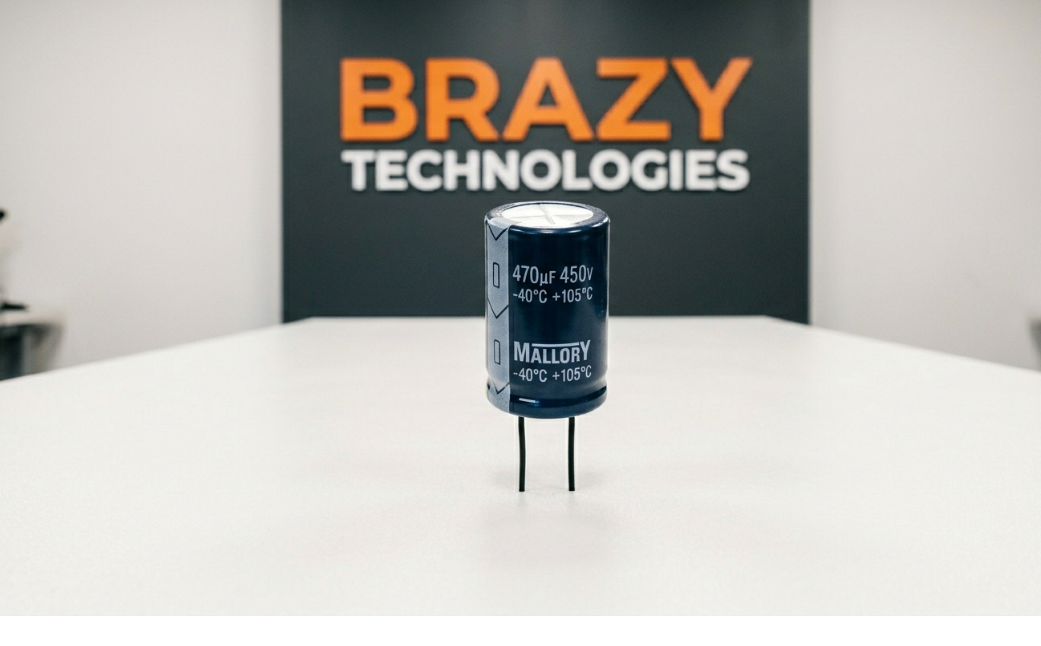
Among all capacitor types, electrolytic capacitors are special because they can hold much more charge than others. They're the "big guys" you see on circuit boards - usually cylindrical and standing upright.
How to Identify an Electrolytic Capacitor
Visual Characteristics:
- - Shape: Cylindrical, like a small can
- - Colors: Usually black, blue, or dark green with a colored stripe
- - Markings: Clearly labeled with capacitance (uF) and voltage (V)
- - Polarity: One side has a negative (-) stripe - THIS IS CRITICAL!
CRITICAL WARNING: Electrolytic capacitors are polarized - they have a positive and negative side. Installing them backwards can cause them to explode, catch fire, or destroy your circuit board. ALWAYS match the negative stripe!
Understanding Capacitor Ratings
Every electrolytic capacitor has two important numbers:
Capacitance (uF): How much charge it can store (Examples: 1000uF, 470uF, 100uF)
Voltage (V): Maximum voltage it can handle (Examples: 16V, 25V, 50V, 100V)
PRO TIP: When replacing a capacitor, the capacitance should match exactly. The voltage can be higher (e.g., 25V can replace 16V), but NEVER lower.
Common Equipment Where Capacitors Fail
Electrolytic capacitors are often the FIRST component to fail because the electrolyte inside dries out over time:
- - Power Supplies - Computer PSUs, laptop chargers, phone chargers
- - Computer Motherboards - Especially around the CPU power delivery
- - LCD Monitors & TVs - Power supply boards
- - Audio Equipment - Amplifiers and receivers
- - Appliances - Washing machines, microwaves, AC units
- - LED Drivers - LED light bulbs and strips
7 Signs of Capacitor Failure
Visible Signs (Easy to Spot):
- Bulging top - The top of the capacitor is domed instead of flat (most common)
- Cracked or leaking - Brown or dried electrolyte around the base
- Burst open - The top vent has split open
- Corroded leads - Rust or discoloration on the legs
Invisible Signs (Need Testing):
- Device won't power on or randomly shuts off
- Excessive heat in a specific area of the board
- Buzzing or whining noise from the power supply
- Intermittent operation - Works sometimes, fails others
THE #1 SIGN: If the top of a capacitor is NOT perfectly flat - it's bulging even slightly - REPLACE IT IMMEDIATELY. Ignoring it can damage other components.
How to Test a Capacitor with a Multimeter
Method 1: Visual Inspection First
Always start with visual inspection. Bulging or leaking capacitors are automatically bad - no testing needed.
Method 2: Resistance Mode Test (for beginners)
1. DISCHARGE THE CAPACITOR FIRST - Use a resistor across the leads
2. Set multimeter to Resistance (Ohms) mode, highest range (200k or 2M)
3. Touch probes to capacitor leads (match polarity)
4. Good capacitor: Reading starts low, slowly increases to infinity (OL)
5. Bad capacitor: Reading stays at 0 (shorted) or infinity (open)
Method 3: Capacitance Mode (more accurate)
1. Set multimeter to Capacitance (uF) mode
2. Connect probes to capacitor leads
3. Good: Reading within 10-20% of labeled value
4. Bad: Reading far off, 0, or unstable
Safely Removing and Replacing Capacitors
Tools You'll Need:
- Soldering iron (at least 40W with temperature control)
- Solder sucker or desoldering wick
- Rosin core solder (60/40 or 63/37)
- Needle-nose pliers
- Flux (makes soldering much easier)
Step-by-Step Replacement:
1. UNPLUG THE DEVICE - Never work on live circuits!
2. Discharge the capacitor - Hold a resistor across its leads (you may see a spark)
3. Mark polarity - Take a photo or mark which side is negative
4. Heat one solder joint while pulling gently on the capacitor leg
5. Remove solder with a sucker or wick
6. Repeat for the other leg
7. Insert new capacitor - MATCH THE POLARITY! Negative stripe aligns with marked side
8. Solder both legs - Ensure good flow and shiny joints
9. Clip excess leads - Flush with the solder joint
10. Clean flux residue with isopropyl alcohol
Capacitor Replacement Cheat Sheet
Original Rating: 1000uF 16V -> Safe Replacement: 1000uF 16V or 25V -> Avoid: Never use lower voltage
Original Rating: 470uF 35V -> Safe Replacement: 470uF 35V or 50V -> Avoid: Different capacitance
Original Rating: 2200uF 10V -> Safe Replacement: 2200uF 10V or 16V -> Avoid: Higher capacitance changes circuit behavior
BUYING TIP: Purchase capacitors from reputable brands: Nichicon, Panasonic, Rubycon, United Chemi-Con, or Japanese-made. Cheap no-name capacitors fail quickly!
Practice Makes Perfect
The best way to learn capacitor replacement is practice. Start with:
- Old computer motherboards (tons of capacitors to practice on)
- Broken power supplies (free from electronics recyclers)
- DVD players or old electronics (safe to experiment on)
Once you've replaced 10-20 capacitors, you'll have the confidence to fix almost any device with power-related issues.
Summary: Key Takeaways
- Electrolytic capacitors store energy and smooth power supply voltage
- Always note polarity - negative side has a stripe!
- Bulging top = dead capacitor, replace immediately
- Match capacitance exactly, voltage can be equal OR HIGHER
- Discharge capacitors before working on them (safety first!)
- Practice on dead boards before fixing valuable equipment
Now you know the basics of electrolytic capacitors! With this knowledge, you can diagnose and fix thousands of devices that fail due to bad caps.
Want to take your skills to the next level? The advanced course covers in-circuit analysis, recapping entire boards, and professional troubleshooting techniques used by repair shops.